It’s no surprise that the Quest 2 can get fairly dirty as it frequently comes in contact with the face, hair, and hands. The oils, dirt, and sweat on your body can not only cause the Quest 2 to look grimy but can also make it a breeding ground for bacteria.
Thankfully, it doesn't require much effort when it comes to cleaning or maintenance and is fairly easy to do without damaging the controllers, headset, or sensitive Fresnel lenses if you know what you're doing.
Head Strap Removal

To start cleaning the headset, first, remove the facial interface (the cushiony pad between your face and the headset) by running your fingers along the edge and gently pulling. You should hear the clips ‘pop’ as it comes away.
Then, undo the velcro at the top of the head strap and thread it back through the loop on the headset. It may become a little stuck at times and require you to wiggle it from side to side as you pull to work its way fully out.
This final step is optional as you can clean your headset with the strap attached but may find it easier to clean with it removed completely. Run your fingers along the edge of where the head strap connects to the two arms of the headset and pry as you go, but do not pull or bend. This can be a little tricky so make sure you pry firmly but with care until the head strap comes off completely.
Cleaning The Headset And Strap
You will need some non-abrasive, alcohol-free antibacterial wipes for this next part. It’s important that the wipes are PH balanced and do not contain any strong solvents that could damage the plastic. A damp, microfibre cloth will also work if you are unable to get the appropriate wipes for the job.

Run the wipes across the plastic casing of the Quest 2 and strap, including the parts of the strap made from fabric material. Try not to pass the wipe over any of the four tracking cameras on the outside.

For those external cameras, just rub them in a circular motion using a dry microfibre cloth. You can also use a slightly damp microfiber cloth on the cameras to remove any stubborn stains if they are particularly dirty.
These next steps are optional, but if the fabric parts of your head strap are particularly dirty, soak them in cold detergent water and scrub any stains with a toothbrush.

The headset also has crevices where it joins together which can harbor all kinds of gunk. To remove this, use the edge of a thin piece of cardboard and run it along any gaps to expel the dirt trapped inside.

Cleaning The Lenses
It’s best to start by cleaning around the lenses first because any dust and dirt we remove from around the lenses could re-dirty them again. Make sure to be extra careful when cleaning around the lenses as the lenses are very sensitive and prone to scratching.
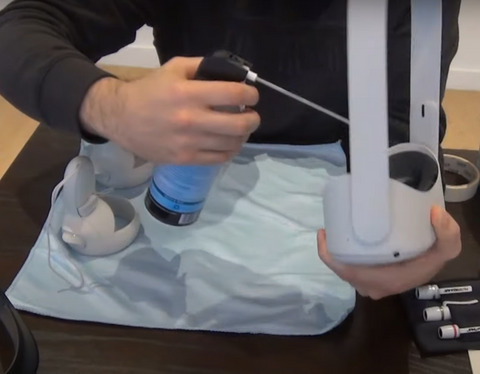
Start by using compressed air to blow away loose dirt and dust from inside the headset. Do not aim the compressed air at the lenses themselves and if you don’t have compressed air, just skip this step. Then take your antibacterial wipes and clean the hard plastic around the lenses, taking extra care not to touch the lenses themselves as they should not come in contact with moisture.
Once the inside is clean, it’s now time to tackle the lenses. Take a dry microfiber cloth and wipe the lens in a circular motion, starting from the center and working your way outward. DO NOT use water or any other cleaning liquid, it’s important that the cloth is completely dry. However, if the dry microfiber cloth is unable to remove a particularly stubborn smudge on the lens, it is okay to slightly fog up the lens using your breath to help remove it.

There is also the option of using a specialized VR LensPen. Other lens pens exist but these are not made for the Quest lenses so make sure you only use the lens pen made for the Quest. Bear in mind that a microfibre cloth will work just fine and the lens pen is the more expensive option.

However, the pen does have some advantages. For example, it creates distance between the lens and your hand which prevents accidental touching. The pen also comes with a specialized brush to remove any grit on the surface of the lens before cleaning.
Cleaning The Facial Interface
How you clean the interface will depend on which one you have. For facial interfaces made from smooth, PU leather or similar material, a quick clean with antibacterial wipes should be fine. If you are using a fabric interface then cleaning is a bit more involved.
A lint roller or balled-up masking tape is perfect for removing fluff that might get caught up in the fabric of the interface. Then finish off by running an antibacterial wipe across the fabric. Some might advise you to soak the fabric interface in detergent water and leave it to dry, but I would advise against this.

Repeatedly soaking the interface can cause the spongy material inside to become brittle and deteriorate. So whilst applying a little moisture to the fabric is fine, soaking it completely could damage it in the long run.
Finally, there is the hard plastic part of the facial interface that connects the spongy facial cushion to the headset itself. That can be cleaned with, you guessed it, an antibacterial wipe or damp microfibre cloth. There may be velcro hooks on the plastic that can sometimes attract fluff, this can be removed with a lint roller or masking tape.
Cleaning The Controllers
The controllers tend to need the most frequent cleaning but are fairly simple to maintain. An antibacterial wipe is good to use across the whole controller, particularly areas where hands will touch like the grip and buttons.
Sometimes, when your controller hits a wall or furniture, it gets a black scuff mark that can’t be removed with wipes. In these cases, check out our article here which goes into detail on how to remove the more stubborn scuffs.
There are also plenty of nooks and crannies between the buttons and joints for dirt to accumulate. As before, running a thin piece of cardboard through any joints should push most of the dirt out.
The area below the thumbstick and between the buttons is a hotspot for dirt and can affect the performance of the controller if it works its way inside. A narrow-ended cotton swab is perfect for cleaning underneath the thumbstick and between buttons.

Now your Quest 2 headset and Controllers should be as good as new!
As a company dedicated to providing innovative and original content, we pride ourselves in also working with influencers that amplify this dedication. Therefore we are honored to collaborate with Tony from VR Reviews helping us to share the latest virtual reality news on our website, please click the image below to find out more.
