Using the Meta Quest 2 as a stand-alone headset makes it a much more convenient device when compared to its cabled competitors. The drawback to this portability often comes at the cost of visuals - with Quest titles usually looking noticeably worse than their desktop-powered counterparts. However, there is a couple of ways that graphics can be improved.
Before we jump into how to do this, a quick word of caution - improving the visuals will make the Quest 2 work harder meaning it will get warmer and the battery will drain faster. Setting the graphics too high could also cause the game to lag and stutter so it may also require some experimentation to find the right balance between performance and visuals. Now with that out of the way, let’s find out how you can boost the Quest 2 graphics!

Free Method: SideQuest
If you are looking for a budget way to boost your Quest 2 graphics then look no further than SideQuest. SideQuest is most well-known for being a platform that hosts early access VR content. It’s a place where developers can post VR content of varying quality and a safe way for Quest users to enjoy this cutting-edge content on their headsets. SideQuest is completely free for both users and developers but it does more than simply serve as an early-access platform for apps and games.
Download SideQuest and make sure that your headset is communicating with it - there are a number of ways to install and use SideQuest which can be found here. How you access these settings to improve the visuals will be different depending on what SideQuest version you are using as SideQuest can be installed on your headset, mobile device, or desktop:
- If using the desktop version of SideQuest you can access the settings along the top by selecting the “Device settings & tools” option (shown by a spanner icon);
- if using SideQuest inside your headset you will find them in “Headset Settings” along the side menu;
- and if using the mobile app select the three dots in the top right corner and go to “Tools”.
You will find a few different settings here such as the option to enable recording in 1080 resolution or to adjust the Fixed Foveated Rendering (FFR) level which affects performance by changing how the visuals are rendered on the outer edges of the viewscreen.
However, the one we are most interested in is the Default Texture Size which changes the quality of some of the in-game textures. The Quest 2 has a default texture size of 2048 so choosing a texture size of 2560 or 3072 should give a noticeable boost to the graphics.
One downside to this is that once set it will apply the graphics setting equally across all games with varying levels of success and the setting is lost each time your Quest 2 is shut down so it will need to be re-enabled through SideQuest upon startup.


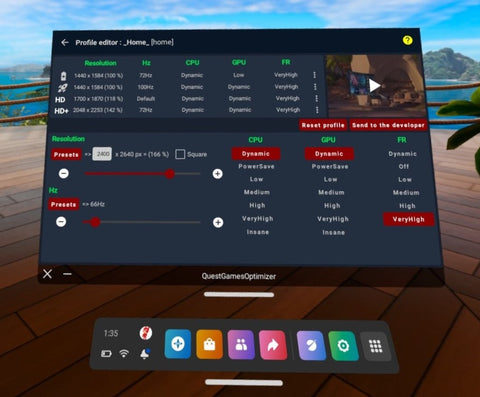
Paid Method: Quest Games Optimizer ($5.99)
Our second method comes at a small cost and requires a few extra steps to set up but has a number of advantages over using SideQuest. The software is an app dedicated to optimizing your Quest 2 and allows you to set your own personalized profiles for each game or use one of over 400 pre-made profiles.
Buy the Quest Games Optimizer app and follow the installation instructions on the webpage to enable it on your headset. Once the app is set up and open, it will automatically apply pre-existing profiles to the games in your library. The profiles allow each game can be optimized to either save battery, increase performance, or render the best graphics. Another advantage of the app is the profile you set is linked to each game meaning that you don’t have to launch the game through the app for the optimization to be applied.
Whilst using the pre-made profiles are the most convenient option, the app lets you manually tweak things until your heart's content - with options to set your own custom resolution and individually adjust the GPU and CPU levels. There’s also something for content creators too, with the option to record videos in up to 2560p, just be aware that optimizing a game’s visuals and enabling 2560p recording at the same time could cause stuttering.
And there we go, two great ways you can increase the performance and visuals of your Quest 2 games. Now your games can be enjoyed in more crispy well-defined detail than ever before!

As a company dedicated to providing innovative and original content, we pride ourselves in also working with influencers that amplify this dedication. Therefore we are honored to collaborate with Tony from VR Reviews helping us to share the latest virtual reality news on our website, please click the image below to find out more.
